For many years our family has participated in a regional art and craft fair that happens every year in our area. It’s a large event that draws in artist and craftsman from around the Southeastern United States. One of our favorite parts of this fair, of course, is that they allow children to participate by selling their art and handmade goods. When my daughter became old enough to participate, we looked for some simple crafts that she can make and candles were one of those crafts.
I should say I thought candles were simple to make. It turns out there’s a real science and definitely an art to making candles. Apparently the melting point of the candle wax and the thickness of the candle’s wick as well as the width of container have to all be proportioned correctly in order for the candle to burn properly. If it’s not proportioned correctly it either burns too hot and causes the flames to flair and flicker and or it burns too slowly causing tunneling into the candle. Who knew?!? I’m sure someone did, but it wasn’t me.
I am by no means a professional candle maker, but I did experiment enough that year to come up with a simple candle that burns correctly out of mason jars for her to make and sale. This recipe only work for half a cup or a full cup jelly mason jars. This combination of wick, coconut oil and beeswax works perfect for the jar with.
Supplies
These are a list of the supplies that we used.
For convenience they are hyperlinked with affiliate links.
Recipe
For these candles the ratio for the Beeswax and coconut oil is 1:2. Apparently, as in baking, it’s best to weigh the ingredients, which we initially did. But eventually we figured out that we could use a cup for measuring and it worked fine. We made three candles at a time, so I used 1 cup of coconut oil and a 1/2 cup of beeswax.
Melt the Beeswax and Coconut Oil
To begin measure your beeswax and coconut oil and melt them in a double boiler. I have a vintage poring pot with a long handle that I’ve used, but I’ve seen cans used as well. It does help to have some kind of spout to make pouring the wax easier. This can be made on a can by bending the rim slightly so there is a point. Unless you’re using the beeswax pellets like we do, I think it would probably work better if the beeswax and the coconut oil were weighed.
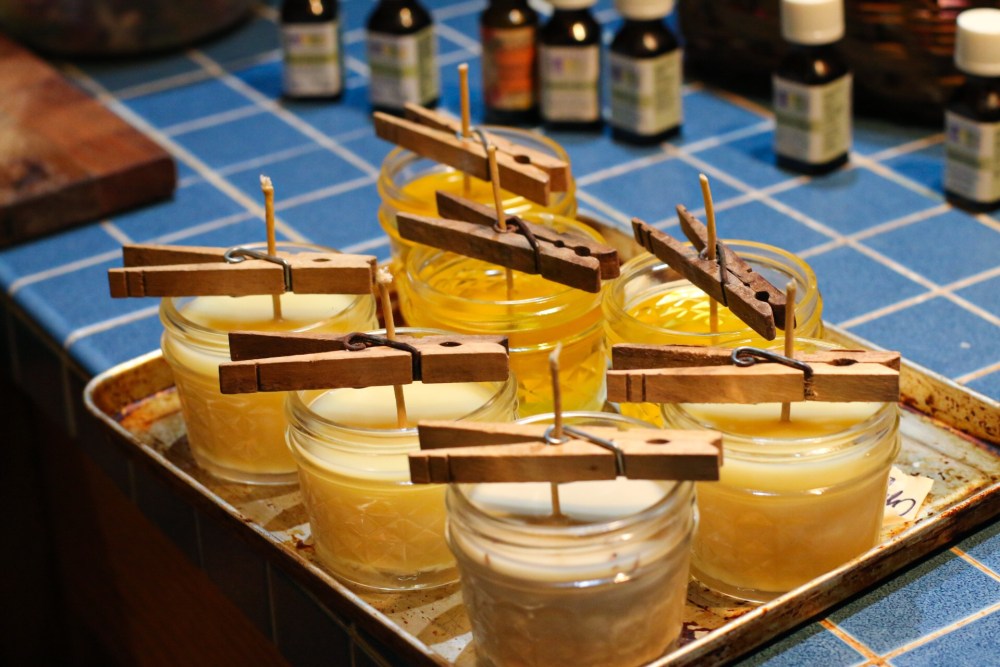
Prepare the Wicks
While I’m melting the wax, I prepare the wicks to the candles. The wicks are a little long for my small jars, so I cut them to a few inches longer than my jars are high. The candles work best if the wicks are as straight as possible, so I run my fingers over the wick gently pulling it to straighten it. Then I dip the anchor in the beeswax, using the melted beeswax as glue, and carefully attach the anchor of the wick in the bottom of the jar in the center. Once the wicks are attached, I use a clothes pin to keep the wick straight and upright throughout the candles making. They make special equipment for this in candles making, but I’ve found that a simple clothes pin meets my needs nicely.

Add Essential Oils for Scent
Because I like a variety of scents I usually just add my essential oils for scent into each individual jar. When we were making a large number of candles for the fair, we would place the scents in the oil and then pour them. I find that quite a bit of essential oil is needed to get a candle you can smell. I used around 20 drops odd essential oil for one half-cup candle and it was a very subtle mild-smelling candle.
Fill the Jars with the Melted Wax
From here I take my melted wax and oil mixture and slowly pour into my mason jars. I full to the lower level of the screw line for the lid. This gives me room to trim the wick and be able to close the jar, but still able to have about an inch-long wick to burn the candle.
Cooling the Candles
Okay, so I’m not quite finished though it seems we should be. There is another trick to having nice smooth candles and that is cooling then very slowly. While melting my wax, I also warned my oven. When I have my candles all set and ready to cool, I placed the entire tray into the warmed oven and turn the oven off and leave the candles to cool. The slow cooling process stops any cracks that may form in the wax.
Burning and Extinguishing the Candle
After the candles are cold, I trim the wick so they’re about an inch from the candle. When lighting the candle for the first time I’ve read that it’s best to leave it until the entire surface of the candle has melted to help prevent tunneling. To extinguish the candle without adding smoke to your house, just place the lid of the jar on the candle and leave until it is used again. These provide nice, pleasant candles for us to use during the winter months of our schooling. They each last hours, and their warm glow brings comfort and joy to us through the hours of schooling together.

Just a note: I participate in Affiliates Programs. When you use the links above, your cost is the same, but I receive a very small commission from your purchase. I use this commission to fund my website to keep it ad free. I want you to experience my website without being bombarded with ads. Thanks for your support. For more information on my relationships see my Policies and Disclosures.